The Model I/O framework was introduced at WWDC 2015, however there is remarkably little sample code out there. Over the past few days I have been trying to write reliable code to import an .OBJ file and apply textures to it. In this article, in the hope that it will save some others some pain, I’ll explain how I got it to work.
Getting Started
To get started download the starter project from GitHub. This project contains a single view app , some graphical resources and a 3D model. The model comes from the Free Star Wars Model Pack from Video Copilot.
Loading the OBJ File
Let’s get started by loading the OBJ file. An OBJ file can be loaded directly into an MDLAsset from a URL.
Open the file ViewController.swift and add the following code to viewDidLoad:
|
1 2 3 4 5 6 7 8 9 |
// Load the .OBJ file guard let url = NSBundle.mainBundle().URLForResource("Fighter", withExtension: "obj") else { fatalError("Failed to find model file.") } let asset = MDLAsset(URL:url) guard let object = asset.objectAtIndex(0) as? MDLMesh else { fatalError("Failed to get mesh from asset.") } |
This code determines a URL for the OBJ model file in the app’s bundle and loads in into a MDLAsset. It then extracts the mesh from the asset. This will be used in the next section to create a SceneKit SCNNode to wrap the model.
Displaying the Scene
To check that the model has loaded correctly it would be nice to display it on the screen. This is a two step process: (1) create a SceneKit scene containing the model and (2) display the scene in a view.
To create the scene add the following code after the code in the previous section:
|
1 2 3 4 |
// Wrap the ModelIO object in a SceneKit object let scene = SCNScene() let node = SCNNode(MDLObject: object) scene.rootNode.addChildNode(node) |
The above code creates an empty SCNScene, an SCNNode containing the model and then adds the model node to the scene.
To display the scene add the following code:
|
1 2 3 4 5 |
// Set up the SceneView sceneView.autoenablesDefaultLighting = true sceneView.allowsCameraControl = true sceneView.scene = scene sceneView.backgroundColor = UIColor.blackColor() |
The sceneView variable here is a computed property in the starter project that refers to an SCNView in the storyboard. The autoenablesDefaultLighting is a convenient option for getting some basic lighting going with minimal code. The allowsCameraControl allows you to rotate, pan and zoom the model via touch gestures. Once these options are set all the remains is to set the scene property to the scene from the previous code section and set the background to black (the default material is light grey so it shows up better against black).
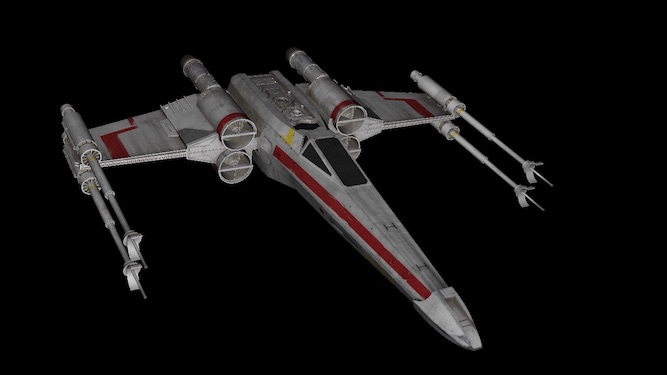
At this point you can run your project and if all is well you should see something like this (after a little rotating and zooming).

The space fighter model with no textures applied.
Texturing the Model
In Model I/O to texture a model you create an MDLMaterial and add properties to it to describe the material.
To create the material add this code just after the extracting the MDLMesh from the model:
|
1 2 3 |
// Create a material from the various textures let scatteringFunction = MDLScatteringFunction() let material = MDLMaterial(name: "baseMaterial", scatteringFunction: scatteringFunction) |
This creates a material with the a default MDLScatteringFunction object.
For each of our textures we need to determine the URL for the texture image, create a MDLMaterialProperty and then add this to the material. Repeating the same few lines of code for each texture is tedious, so instead I created an extension on MTLProperty to simplify this.
Add the following code at file scope:
|
1 2 3 4 5 6 7 8 9 10 11 |
extension MDLMaterial { func setTextureProperties(textures: [MDLMaterialSemantic:String]) -> Void { for (key,value) in textures { guard let url = NSBundle.mainBundle().URLForResource(value, withExtension: "") else { fatalError("Failed to find URL for resource \(value).") } let property = MDLMaterialProperty(name:value, semantic: key, URL: url) self.setProperty(property) } } } |
This extension lets us pass a dictionary of MDLMaterialSemantic and String pairs, the former is an enum that specifies what the property is intended to be, for example .BaseColor, .Specular or .Emission
With this extension in place we can specify the three textures for this material compactly as follows:
|
1 2 3 4 |
material.setTextureProperties([ .BaseColor:"Fighter_Diffuse_25.jpg", .Specular:"Fighter_Specular_25.jpg", .Emission:"Fighter_Illumination_25.jpg"]) |
The final step of texturing is to apply the material to all the submeshes of the object:
|
1 2 3 4 5 6 |
// Apply the texture to every submesh of the asset for submesh in object.submeshes { if let submesh = submesh as? MDLSubmesh { submesh.material = material } } |
You can compile and run your project. You should now see a much more impressive model.
The texture space fighter.
Conclusion
Model I/O does allow you load models with relative few lines of code, but some of the steps are unintuitive, for example, it took me quite some time to figure how to attach the textures to the model. There also seem to be some bugs and poorly documented areas. Some additional sample code from Apple would do a lot to clear up some of these mysteries.
I hope the code I’ve presented here will help you avoid some of the pitfalls I made. The completed code can be found in the GettingStartedWithModelIO repository on GitHub.
Ads on this site help keep the servers running. Please take a moment to peruse our sponsors and perhaps visit one.
Super happy you took the time and figure this out! Completely agree that there’s way too little sample code out there around ModelIO. Love the tutorial and it’s pretty useful, must say that I was surprised by the user experience: the 3D viewer turns out to be pretty responsive. But now an interesting question, can you get this to dynamically load an OBJ file? I mean, how to download a file at runtime and show it in the viewer? I’ve tried your solution but got “No vertices in OBJ file” for a file downloaded from my parse server. Hope you can help me out, I have been searching a while to get an answer but unfortunately … no luck so far.
Thanks,
Pieter
Sorry for the delay in replying. Your comment got caught in an wave of spam comments. If you’re getting “No vertices in OBJ file” one of two things is going wrong: (1) you may be trying to open the file before it is fully downloaded (2) the OBJ file may be malformed. If you think it’s neither of these two send me a file and I’ll take a peek and see if I can figure it out.
Can you explain why use only this types “.BaseColor .Specular .Emission” from enum ? a have more images with textures for my object, i have done the same and don’t see any textures on my object
I used only these types because the model only had these textures available. If you have more textures you will need to assign them to the correct types. If you see no textures the most likely problem is that your texture coordinates are not correctly specified.
Thank you for this easy-to-follow tutorial.
I was wondering how can I load an .obj file from a remote server. I’m trying to download an .obj file as a Data, then I create a URL using URL(dataRepresentation: mydata, relativeTo: nil). the problem I’m facing is that I can’t create a MDLAsset using this URL.
There are quite a few sample codes for ModelIO for some reason, so I’d appreciate if you could help me with this.
Thanks