A new version of this tutorial, updated for Xcode 5 and iOS 7, is available here: Building a Web Browser with UIWebView Revisited (Part 1).
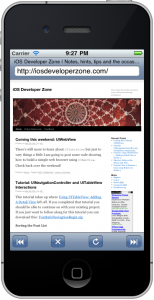
In the next few tutorials you will learn how to use UIWebView to create a simple web browser. The finished browser is shown in Figure 1. You’ll also learn how to create and layout user interface (UI) element programmatically when you cannot get the results you want in the visual editor.
In this tutorial, I will assume you know how to create a project in XCode and you understand the basics of using the visual UI editor (formerly known as Interface Builder). If this is not the case, you might consider doing the UITableView tutorials first. They describe in detail creating a project and the basic use of the visual editor.
To get started create a view based project in XCode and save it as WebBrowser.
Creating the IBOutlets.
Before laying out the UI, you’ll first add the IBOutlets that this first stage of the project will use. Open WebBrowserViewController.h and make the following modifications.
@interface WebBrowserViewController : UIViewController<UIWebViewDelegate> {
    UIWebView* mWebView;
    UIToolbar* mToolbar;
    UIBarButtonItem* mBack;
    UIBarButtonItem* mForward;
    UIBarButtonItem* mRefresh;
    UIBarButtonItem* mStop;
}

@property (nonatomic, retain) IBOutlet UIWebView* webView;
@property (nonatomic, retain) IBOutlet UIToolbar* toolbar;
@property (nonatomic, retain) IBOutlet UIBarButtonItem* back;
@property (nonatomic, retain) IBOutlet UIBarButtonItem* forward;
@property (nonatomic, retain) IBOutlet UIBarButtonItem* refresh;
@property (nonatomic, retain) IBOutlet UIBarButtonItem* stop;

- (void)updateButtons;

@end
Open WebBrowserViewController.m and add the synthesis code at the top of the @implementation section.
//...

@implementation WebBrowserViewController
@synthesize webView = mWebView;
@synthesize toolbar = mToolbar;
@synthesize back = mBack;
@synthesize forward = mForward;
@synthesize refresh = mRefresh;
@synthesize stop = mStop;

//...
You might as well get dealloc and viewDidLoad out of the way too.
- (void)dealloc
{
    [mWebView release];
    [mToolbar release];
    [mBack release];
    [mForward release];
    [mRefresh release];
    [mStop release];
    [super dealloc];
}
- (void)viewDidUnload
{
    self.webView = nil;
    self.toolbar = nil;
    self.back = nil;
    self.forward = nil;
    self.refresh = nil;
    self.stop = nil;
    [super viewDidUnload];
}
Laying Out the User Interface
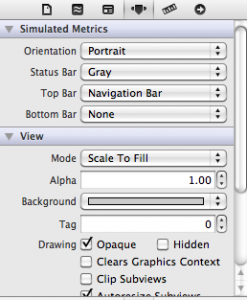
Click on the WebBrowserViewController.xib file. Click on the view and in the attributes inspector, under simulated metrics, choose navigation bar for the top bar. You can refer to Figure 2 to see what this looks like.
This does not actually add a navigation bar to the user interface, it just simulates one as an aid to layout. Later you will add a custom navigation bar programmatically.
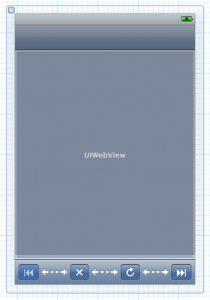
Drag a UIToolbar from the objects library onto the view and drag it to the bottom. Drag a UIWebView into the central area of the view. In addition to the default bar button on the toolbar, drag three more onto the toolbar. Adjust the identifiers for the bar button items to be Rewind, Stop, Refresh and Fast Forward. Finally insert three flexible space bar button items one between each pair of bar button items to space them out.
Connecting the UI and Code
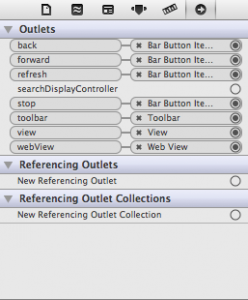
To connect up the IBOutlets you added in WebBrowserViewController.h at the start of the tutorial, click on the file’s owner icon and switch to the connections inspector. Drag from each of the outlets onto the corresponding UI element. When you are finished the connections inspector should look like Figure 4.
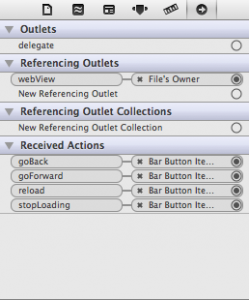
In addition to IBOutlets, the visual editor can connect actions performed on UI elements to methods in the code known as IBActions. With the connections inspector still selected, click on the web view. You’ll notice a list of received actions: goBack, goForward, reload and stopLoading. Connect each of these actions to their respective bar buttons by dragging from the empty circle to the bar button item. When you are finished your connections inspector should look like Figure 5.
The UIWebViewDelegate
You next task is to add the methods from the UIWebViewDelegate protocol to WebBrowserViewController.m.
// MARK: -
// MARK: UIWebViewDelegate protocol
- (BOOL)webView:(UIWebView *)webView shouldStartLoadWithRequest:(NSURLRequest *)request navigationType:(UIWebViewNavigationType)navigationType
{
    return YES;
}

- (void)webViewDidStartLoad:(UIWebView *)webView
{
    [UIApplication sharedApplication].networkActivityIndicatorVisible = YES;
    [self updateButtons];
}
- (void)webViewDidFinishLoad:(UIWebView *)webView
{
    [UIApplication sharedApplication].networkActivityIndicatorVisible = NO;
    [self updateButtons];
}
- (void)webView:(UIWebView *)webView didFailLoadWithError:(NSError *)error
{
    [UIApplication sharedApplication].networkActivityIndicatorVisible = NO;
    [self updateButtons];
}
The method shouldStartLoadWithRequest is called before the browser starts loading content and could, for example, be used to implement an ad blocker. In your case just return YES for the moment. The other methods should be relatively self explanatory and the code you added to them is to show and hide the network activity indicator in the status bar and to update the states of the toolbar buttons. You’ll also need to add the code to update the buttons:
- (void)updateButtons
{
    self.forward.enabled = self.webView.canGoForward;
    self.back.enabled = self.webView.canGoBack;
    self.stop.enabled = self.webView.loading;
}
This code uses properties of UIWebView to determine which buttons should be enabled.
Post-load Configuation: viewDidLoad
You’re almost ready for your first test run, just a few more lines of code.
- (void)viewDidLoad
{
    [super viewDidLoad];
    NSAssert(self.back, @"Unconnected IBOutlet 'back'");
    NSAssert(self.forward, @"Unconnected IBOutlet 'forward'");
    NSAssert(self.refresh, @"Unconnected IBOutlet 'refresh'");
    NSAssert(self.stop, @"Unconnected IBOutlet 'stop'");
    NSAssert(self.webView, @"Unconnected IBOutlet 'webView'");

    self.webView.delegate = self;
    self.webView.scalesPageToFit = YES;
    NSURL* url = [NSURL URLWithString:@"https://iosdeveloperzone.com"];
    NSURLRequest* request = [NSURLRequest requestWithURL:url];
    [self.webView loadRequest:request];
    [self updateButtons];
}
Lines 4-7 are there to detect missing IBOutlet connections.
Line 5 sets you view controller as the delegate for the web view. If you don’t do this, none of the methods you added in the last section would be called. Lines 11-13 programmatically load a default URL. Since you haven’t added the address bar yet there is no way for the user to enter a URL. Later this code will load the user’s home page.
At this points you should be able to build your project and a web page loaded. Tomorrow you’ll add the address bar.
If your code does not work you may want to compare it to the completed code for this part of the tutorial: WebBrowser1.zip
This site is ad supported. Please consider visiting our sponsors while downloading.

Pingback: iOS Browser App with custom context menu option | taking a bite into Apple
Pingback: July 23: Building an iOS app in Xcode « Saturday At Two
Great tutorial. Easy to integrate in any project. Thanks. Much appreciated.
You’re welcome. I’m glad you found it useful.
Great tutorial, I am having one issue with back/forward buttons using a jQuery history module. My website is not typical in that it contains links that load a new page, but links that make AJAX calls to retrieve data and then outputs a new page on the web browser.
So everything looks like it is index.html but the address bar does change its URI parameters (e.g. index.html?type=x&action=1). Do you know of anyway UIWebView could support this? The native Safari browser on the iOS device works fine when loading the same website.
Sorry for the delay in responding, it’s been a busy few weeks. I unfortunately do not know how to solve the problem you are encountering. The best advice I can offer you is to post your question on stackoverflow.com. There are a lot of really knowledgable and helpful folks on that site. Sorry I can’t be more helpful. If you do find a solution let me know and I will update the tutorial to include it.
Pingback: Tutorial: Building a Web Browser with UIWebView Part 1 | iOS Developer Zone – 码农们的博客