In this tutorial you’ll learn how to add a detail view controller to a the UITableView you created in the first Using UITableView tutorial. You’ll be using the visual editor in XCode 4 to layout the view.
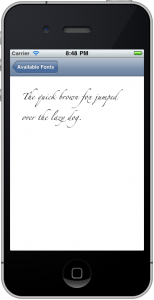
The view you’ll be creating is shown in Figure 1. It consists of a UITextView in the upper half of the screen into which the user can type sample text.
Since this is the first time I have described using XCode 4’s visual editor I am going to go step by step. This makes this quite a long tutorial. In future I will assume you know all of this.
The starting point for this project is where the first UITableView tutorial left off, so you can continue on with the same project, or if you prefer you can download the starter project FontInfoDetailBegin.zip
Creating a New Class
To get started choose File > New > New File… or hit Command-N.
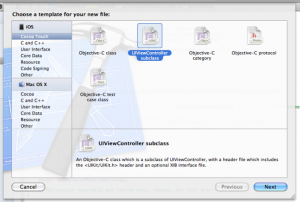
Choose “Cocoa Touch” and “UIViewController subclass”.
Click Next.
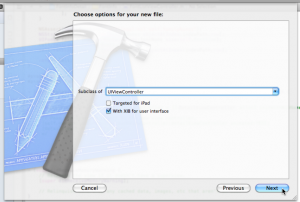
Enter “UIViewController” as shown in Figure 3.
Check the box “With XIB for user interface” if it is not already checked..
Click Next.
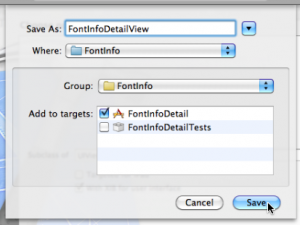
Enter FontInfoDetailViewController. Click Save.
You’ll notice XCode has created 3 new files FontInfoDetailViewController.h, FontInfoDetailViewController.m and FontDetailViewController.xib.
Editing the View
Click on FontInfoDetailViewController.xib to open the visual editor.
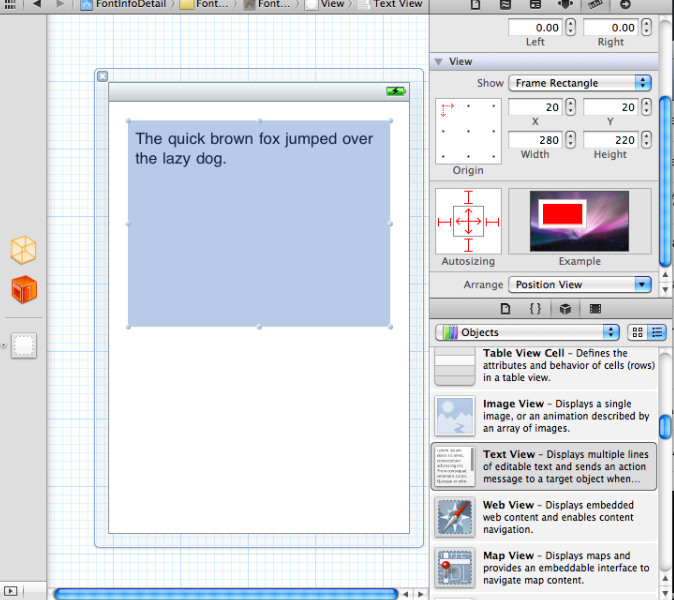
Drag a Text View from the Object Library onto the view.
Using the resizing handles resize it so it looks something like Figure 5.
Click on the text view and replace the “Lorem Ipsum…” text with some of your own. I used “The quick brown fox jumped over the lazy dog.” to show off all the letters in the font, albeit in lower case.
Save your work by chosing File > Save or hitting Command-S.
Connecting Code and View
Now that you’ve added the UITextView to your view you need to add some code to the class to allow you to communicate with the view.
Click on FontInfoDetailViewController.h and add the highlighted lines:
@interface FontInfoDetailViewController : UIViewController {
    UITextView* mTextView;
}

@property (nonatomic, retain) IBOutlet UITextView* textView;

@end
Let’s examine this in a little more detail. Line 2 defines a instance variable to hold the text view and line 5 defines a property which you’ll use to access that variable. The property is tagged with IBOutlet. This tag makes the property visible in the visual editor (in XCode 3 the visual editor was a separate program called Interface Builder, or IB for short, hence IBOutlet.
Save your work by chosing File > Save or hitting Command-S.
Your next task is to connect the newly added code to the text view. Click on FontInfoDetailViewController.xib to reopen the visual editor.
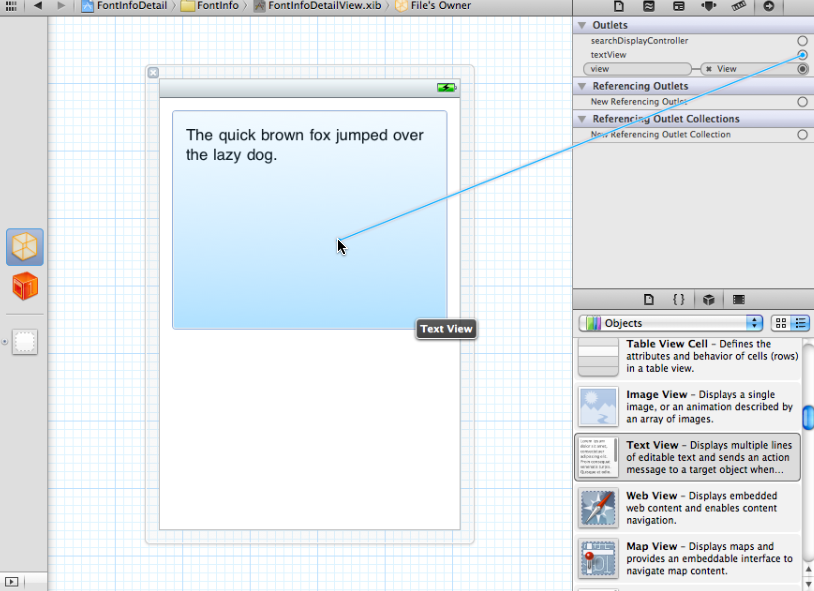
Click the topmost icon in the lefthand margin, it looks like a yellow wireframe cube (see Figure 6). This icon represents the “File’s Owner” or the owner of the view you are designing. In this case, this is the FileInfoDetailViewController.
On the right hand side of the toolbar click the icon that looks like an arrow in a circle (once again refer to Figure 6). This icon chooses the Connection Inspector panel. The textView property that you tagged with IBOutlet should be visible in this window and to its right there should be an empty circle.
Click your mouse in this circle and drag to the text view and release your mouse. This will create connect the text view to the textView property in your code.
This is a good time to save your work.
Click on FileInfoDetailViewController.m to open it in the editor and locate viewDidLoad. The viewDidLoad method is called by UIKit when your view has been successfully loaded. This is a good place to check that all your outlets are correctly connected and complete any initialization of your view that could not be performed in the visual editor. Add the highlighted line so your code looks like this:
- (void)viewDidLoad
{
    [super viewDidLoad];
    // Do any additional setup after loading the view from its nib.
    NSAssert(self.textView, @"self.textView must not be nil. Did you forget to connect its IBOutlet?");
}
It’s really easy to forget to connect up an IBOutlet. If you do your code won’t crash, it just won’t do the right thing. This line will cause your code to crash into the debugger if the IBOutlet is not correctly connected.
Since the textView property retains the view, you need to be careful to release if when the view is unloaded or when you view is deallocated. When your view is unloaded UIKit calls viewDidUnload. Locate that method and add the highlighted line.
- (void)viewDidUnload
{
    self.textView = nil;
    [super viewDidUnload];
}
In dealloc you need to release the view slightly differently to avoid calling accessors.
- (void)dealloc
{
    [mTextView release];
    [super dealloc];
}
You’re almost ready to do your first test run. The final piece of code you need to add is the code to display the new detail view when the user clicks on one of the rows in the font list.
Open FontListViewController and locate the didSelectRowAtIndexPath method. Edit the template code so that it is that same as the code below.
- (void)tableView:(UITableView *)tableView didSelectRowAtIndexPath:(NSIndexPath *)indexPath {
    FontInfoDetailViewController *detailViewController = [[FontInfoDetailViewController alloc]
                                                         initWithNibName:@"FontInfoDetailViewController" bundle:nil];
    NSAssert(detailViewController, @"Failed to load detail view controller");
    [self.navigationController pushViewController:detailViewController
                                                            animated:YES];
    [detailViewController release];
}
Save your work.
You are now ready to do your first test run. Build and run the project. If all goes well you should be able to select a row in the font list and the new detail view will slide in. You’ll notice that the font in the detail view does not match the font you choose. You’ll remedy that in the next section.
Passing Information to the Detail View Controller
You will use a property to communicate the font information to FontInfoDetailViewController. Open FontInfoDetailViewController.h and add the highlighted code.
@interface FontInfoDetailViewController : UIViewController {
    UIFont* mFont;
    UITextView* mTextView;
}
@property (nonatomic, retain) UIFont* font;
@property (nonatomic, retain) IBOutlet UITextView* textView;
@end
Save your changes.
Open FontInfoDetailViewController.m and add a @synthesize statement for the newly added property.
@implementation FontInfoDetailViewController
@synthesize font = mFont;
@synthesize textView = mTextView;
Since the property is marked retain before you go any further update viewWillUnload and dealloc.
- (void)viewDidUnload
{
    self.textView = nil;
    self.font = nil;
    [super viewDidUnload];
}
- (void)dealloc
{
    [mTextView release];
    [mFont release];
    [super dealloc];
}
You’ll have fewer problems with memory leaks if you get into the habit of adding your release code as soon as you add your alloc or retain code.
The final change to the detail view controller is to set text view’s font.
- (void)viewDidLoad
{
    [super viewDidLoad];
    NSAssert(self.textView, @"self.textView must not be nil. Did you forget to connect its IBOutlet?");
    NSAssert(self.font, @"self.font must not be nil.");
    self.textView.font = self.font;
}
Save this file.
You need to set the value of the font property before the detail view becomes visible. Open FontListViewController.m update didSelectRowAtIndexPath as shown below.
- (void)tableView:(UITableView *)tableView didSelectRowAtIndexPath:(NSIndexPath *)indexPath
{
    UITableViewCell* cell = [tableView cellForRowAtIndexPath:indexPath];
    NSAssert(cell, @"Selected cell must not be nil.");
    FontInfoDetailViewController *detailViewController = [[FontInfoDetailViewController alloc] initWithNibName:@"FontInfoDetailViewController" bundle:nil];
    NSAssert(detailViewController, @"Failed to load detail view controller");
    detailViewController.font = cell.textLabel.font;
    [self.navigationController pushViewController:detailViewController animated:YES];
    [detailViewController release];
}
Line 3 retrieves the selected cell from the table view. Line 4 makes sure that this happened correctly. Line 7 sets the font property.
You can now build and run the project. The font in the detail view should now be set to match the one chosen from the list.
There are still a couple of thing that need to be done to polish this program. In the next tutorial you will:
- Sort the fonts in the font list alphabetically.
- Show the font name in the navigation area of the detail view.
- Shorten the title of the back button in the detail view.
I hoping to have this up tomorrow, so please check back then! If you have problems getting the code to run you may want to compare your work to the completed project: FontInfoDetailFinished.zip

