
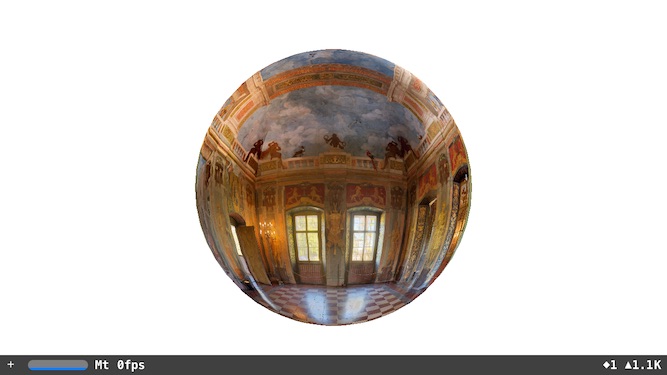
This article describes how to use SceneKit and CoreMotion to create a 360º panoramic photo viewer that lets you explore the scene by moving your phone around. For the purposes of this article I’ll use the image below from Wikipedia.

360º panoramic view of Hellbrunn banqueting hall by MatthiasKabel
Getting Started
To get started, download the template source code PanoView-1.0.zip. This is a simple, single view project with a SCNSceneView occupying the entire view and a suitably scaled version of the above photograph as a resource.
Loading Assets
The first step in our panoramic photo viewer is to load a photograph. This could come from the user’s camera roll or a URL, but for simplicity I am just going to load a photograph from the resource bundle.
Open the file ViewController.swift and add the code below to your viewDidLoad() method:
|
1 2 3 4 5 6 7 |
// Load assets guard let imagePath = NSBundle.mainBundle().pathForResource("Hellbrunn25", ofType: "jpg") else { fatalError("Failed to find path for panaromic file.") } guard let image = UIImage(contentsOfFile:imagePath) else { fatalError("Failed to load panoramic image") } |
this finds the image file in the bundle and creates a UIImage from it. I found that using this two-step process allowed me to use bigger photographs than the simpler one-step method using UIImage(named:). I did not investigate why this was so.
Making a Scene
Everything in SceneKit belongs to a SCNScene. You could create all your objects first, then create your scene and them to it, but I prefer creating the scene first and adding the objects as I go along.
Add the following below the previous code:
|
1 2 3 4 5 |
// Set the scene let scene = SCNScene() sceneView.scene = scene sceneView.showsStatistics = true sceneView.allowsCameraControl = true |
This creates a scene and sets it on the sceneView property of the view controller. The sceneView property is an IBOutlet set up in the template project to reference the SCNSceneView in the storyboard. The showStatistics property controls the display of some interesting and useful performance information on the view and the allowsCameraControl allows the camera to be manipulated by touch gestures.
The way our panoramic photo viewer is going to work is by projecting the photo onto the inside of a sphere. The following code does that:
|
1 2 3 4 5 6 7 |
//Create node, containing a sphere, using the panoramic image as a texture let sphere = SCNSphere(radius: 20.0) sphere.firstMaterial!.doubleSided = true sphere.firstMaterial!.diffuse.contents = image let sphereNode = SCNNode(geometry: sphere) sphereNode.position = SCNVector3Make(0,0,0) scene.rootNode.addChildNode(sphereNode) |
In SceneKit the scene is created as a hierarchy of SCNNodes. Nodes can contain geometry, lights, cameras, etc. Here we create a sphere geometry using the photo as the “material” to make it out of or, if you are familiar with Metal or OpenGL, we are using the photo as a texture for the sphere. We need to specify that material doubleSided so that it can be seen from the inside of the sphere. This newly created sphere is then wrapped in a node, positioned at the origin (0,0,0) and added to the scene.
At this point you can compile and run the project, but the results may not be what you were expecting…
While this is a very pretty marble, this is not quite what we are trying to achieve!
The problem here is that we are viewing the sphere from the outside. We want to view it from the inside.
Putting the Camera Inside the Sphere
To view the sphere from the inside, we create a camera node and position it inside the sphere. Recall we placed the sphere at the origin (0,0,0) so placing the camera there will center it in the sphere.
The following code does the trick.
|
1 2 3 4 |
// Camera, ... cameraNode.camera = SCNCamera() cameraNode.position = SCNVector3Make(0, 0, 0) scene.rootNode.addChildNode(cameraNode) |
If you now compile and run the project things are looking much better. You can use gestures to look around this magnificent hall.
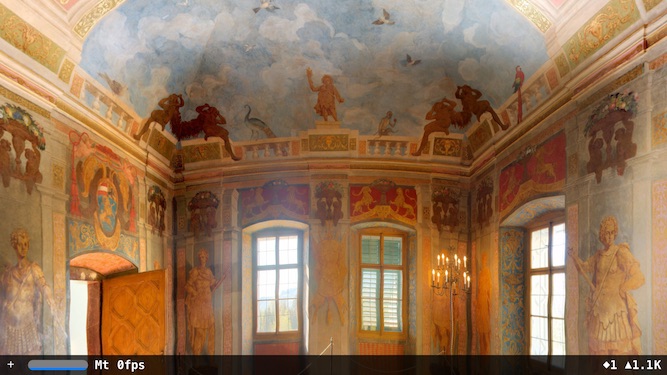
The view from inside the sphere.
Controlling the Camera with Core Motion
So with a surprising small amount of code you’ve managed to get something pretty cool working, but it would be much cooler if the virtual camera would react to your phone’s movements. Well luckily with a little CoreMotion magic we can make that happen!
Since different devices have different capabilities the first order of business is to check that we will be able to monitor device motion.
Add the following code to your viewDidLoad after everything else:
|
1 2 3 |
guard motionManager.deviceMotionAvailable else { fatalError("Device motion is not available") } |
The motionManager property is set in the template code around line 16 as follows:
|
1 |
let motionManager = CMMotionManager() |
Knowing that the capability is available we can request iOS periodically update us with the device’s orientation, or as CoreMotion refers to it, borrowing from aerospace terminology attitude.
|
1 2 3 4 5 6 7 8 9 10 11 12 |
// Action motionManager.deviceMotionUpdateInterval = 1.0 / 60.0 motionManager.startDeviceMotionUpdatesToQueue(NSOperationQueue.mainQueue()) { [weak self](data: CMDeviceMotion?, error: NSError?) in guard let data = data else { return } let attitude: CMAttitude = data.attitude self?.cameraNode.eulerAngles = SCNVector3Make( Float(attitude.roll - M_PI/2.0), Float(attitude.yaw), Float(attitude.pitch)) } |
The above code requests updates at 60fps by setting the deviceMotionUpdateInterval property to 1/60th of a second. It then starts updates on the main queue. These updates are processed by the trailing block which receives data and error arguments. If there is an error data would be nil and error would give further information. I choose, in rather cowardly fashion, to simply return if data was nil. You may want to do something more graceful.
The attitude field of CMDeviceMotion contains the device attitude in three different representations, Euler angles, a rotation matrix and a quaternion. I choose Euler angles because, quite honestly, I was a little rusty in how to use the other two. In the case of the iPhone, the three Euler angles roll, pitch and yaw refer to rotation around a axis running through the device from top to bottom, an axis running through the device from side to side and rotation around an axis passing perpendicularly through the center of the screen respectively, in radians. If the view controller was allowed to rotate in response to device orientation I found it quite tricky to get the camera to behave as I wanted, so I locked the app orientation to landscape left. With that in place, I found that the camera the assignments made in the above code work well. The 90º rotation on roll (π/2) was needed to ensure that when the phone was lying flat on a desk the view would be of the floor.
If you compile and run your project now you should be able to peer around the hall by simply moving your phone around!
Conclusion
I was fairly surprised when I started playing with SceneKit how little code was required to set up a scene. If you are familiar with Metal or OpenGL you will understand what I am talking about. While these two technologies are very powerful they require a lot of boilerplate just to get something to appear on the screen; SceneKit is much more forgiving.
This article has only scratched the surface of what can be done. To find out more about SceneKit I highly recommend Scene Kit Tutorial: Getting Started by Ricardo Rendon Cepeda at RayWendelich.com. For a deeper dive into CoreMotion see NSHipter’s CMDeviceMotion by Nate Cook.
The completed code for the tutorial can be found in the PanoView GitHub repository.
If you enjoyed this article please consider taking a moment to visit one of our sponsors!
Pingback: Implementing a 360º Video Viewer with SpriteKit and SceneKit | iOS Developer Zone
The resulting image has distorted lines in it. Have you noticed that? Look closely at the windows and doorways.